分类 Linux 相关 下的文章

写一个有依赖的Linux 内核模块

接上一篇 写一个 Linux内核 hello world 模块, 这次我们写2个内核模块 hello & world, 并且 world 模块依赖于 hello 模块.

hello 模块

源代码: hello.c

#include <linux/module.h>
#include <linux/init.h>

static int __init hello_init(void)
{
        pr_info("hello module is loaded\n");
        return 0;
}

static void __exit hello_exit(void)
{
        pr_info("hello module is unloaded\n");
}

void say_hello(void)
{
        pr_info("hello ");
}

EXPORT_SYMBOL(say_hello);

module_init(hello_init);
module_exit(hello_exit);
MODULE_LICENSE("free");

world 模块

源代码: world.c

#include <linux/module.h>
#include <linux/init.h>

void say_hello(void);

static int __init world_init(void)
{
        pr_info("world module is loaded\n");
    say_hello();
        pr_info("world\n");
        return 0;
}

static void __exit world_exit(void)
{
        pr_info("world module is unloaded\n");
}

module_init(world_init);
module_exit(world_exit);
MODULE_LICENSE("free");

Makefile

源代码: Makefile. 缩进使用 tab.

obj-m := world.o hello.o

KDIR := /lib/modules/`uname -r`/build/
PWD := $(shell pwd)

default:
    $(MAKE) -C $(KDIR) M=$(PWD) modules

clean:
    $(MAKE) -C $(KDIR) M=$(PWD) clean

编译模块

$ make
make -C /lib/modules/`uname -r`/build/ M=/home/supra/work/modules/deps modules
make[1]: Entering directory '/home/supra/work/jammy/jammy-Ubuntu-5.15.0-70.77-test'
  CC [M]  /home/supra/work/modules/deps/world.o
  CC [M]  /home/supra/work/modules/deps/hello.o
  MODPOST /home/supra/work/modules/deps/Module.symvers
  CC [M]  /home/supra/work/modules/deps/hello.mod.o
  LD [M]  /home/supra/work/modules/deps/hello.ko
  BTF [M] /home/supra/work/modules/deps/hello.ko
  CC [M]  /home/supra/work/modules/deps/world.mod.o
  LD [M]  /home/supra/work/modules/deps/world.ko
  BTF [M] /home/supra/work/modules/deps/world.ko
make[1]: Leaving directory '/home/supra/work/jammy/jammy-Ubuntu-5.15.0-70.77-test'

加载模块

$ sudo insmod hello.ko

$ tail -n 1  /var/log/syslog
Jul 10 14:15:22 supra kernel: [ 3313.748762] hello module is loaded

$ sudo cat /proc/modules | grep hello
hello 16384 0 - Live 0xffffffffc0797000 (POE)

$ sudo insmod world.ko

$ tail -n 3 /var/log/syslog
Jul 10 14:19:22 supra kernel: [ 3553.077383] world module is loaded
Jul 10 14:19:22 supra kernel: [ 3553.077385] hello
Jul 10 14:19:22 supra kernel: [ 3553.077386] world

$ sudo cat /proc/modules | grep hello
hello 16384 1 world, Live 0xffffffffc0797000 (POE)

查看模块依赖

$ lsmod | grep hello
hello                  16384  1 world

$ lsmod | grep world
world                  16384  0
hello                  16384  1 world

相反顺序卸载模块

$ sudo rmmod world.ko
$ sudo rmmod hello.ko

$ tail -n 2 /var/log/syslog
Jul 10 14:26:00 supra kernel: [ 3949.339943] world module is unloaded
Jul 10 14:26:05 supra kernel: [ 3954.185122] hello module is unloaded

Mac 安装 VirtualBox, 创建 Ubuntu 虚拟机

为了学习 Linux Kernel 的准备工作, 要在本地安装 VirtualBox, 然后使用虚拟机. 即使把VM搞挂, 也不用担心.

MAC 安装 VirtualBox

  1. https://www.virtualbox.org/wiki/Downloads 下载合适的安装包.
  2. 双击下载的 dmg 文件, 按照步骤一步步安装.
  3. 启动 VirtualBox 程序.

VirtualBox 安装 Ubuntu

  1. https://ubuntu.com/download/server 下载 Ubuntu ISO image(我选的服务器版本, 不是桌面版).
  2. 在 VirtualBox 界面上面的菜单中 点击 New(新建), 填入名字, 选择ISO 文件, 下一步(next)
    portForward.png
  3. 设置 用户名/密码, 设置内存/CPU/虚拟磁盘, 查看设置, 完成. 过程中, MAC 可能问你要一些权限, 给.
  4. 然后安装 Ubuntu: 选择语言, 键盘, 一路next, 最后 安装完成. 选择 “reboot now”.
    在上面的步骤里, 其中有一步是 安装 ssh server, 注意要手动选上, 后面可以直接本地 ssh.
  5. 启动后, 输入刚才设置的 用户名/密码 就能登录了.

本地 ssh 连接

虽然上面是安装的服务器版本, 但是直接从 VirtualBox 的界面操作还是不方便, 最好是本地ssh 连接. 上面的安装步骤里 已经选择了安装 ssh 服务器, 如果你没有安装, 可以从 VirtualBox 的界面登录进入, 安装 ssh 服务.

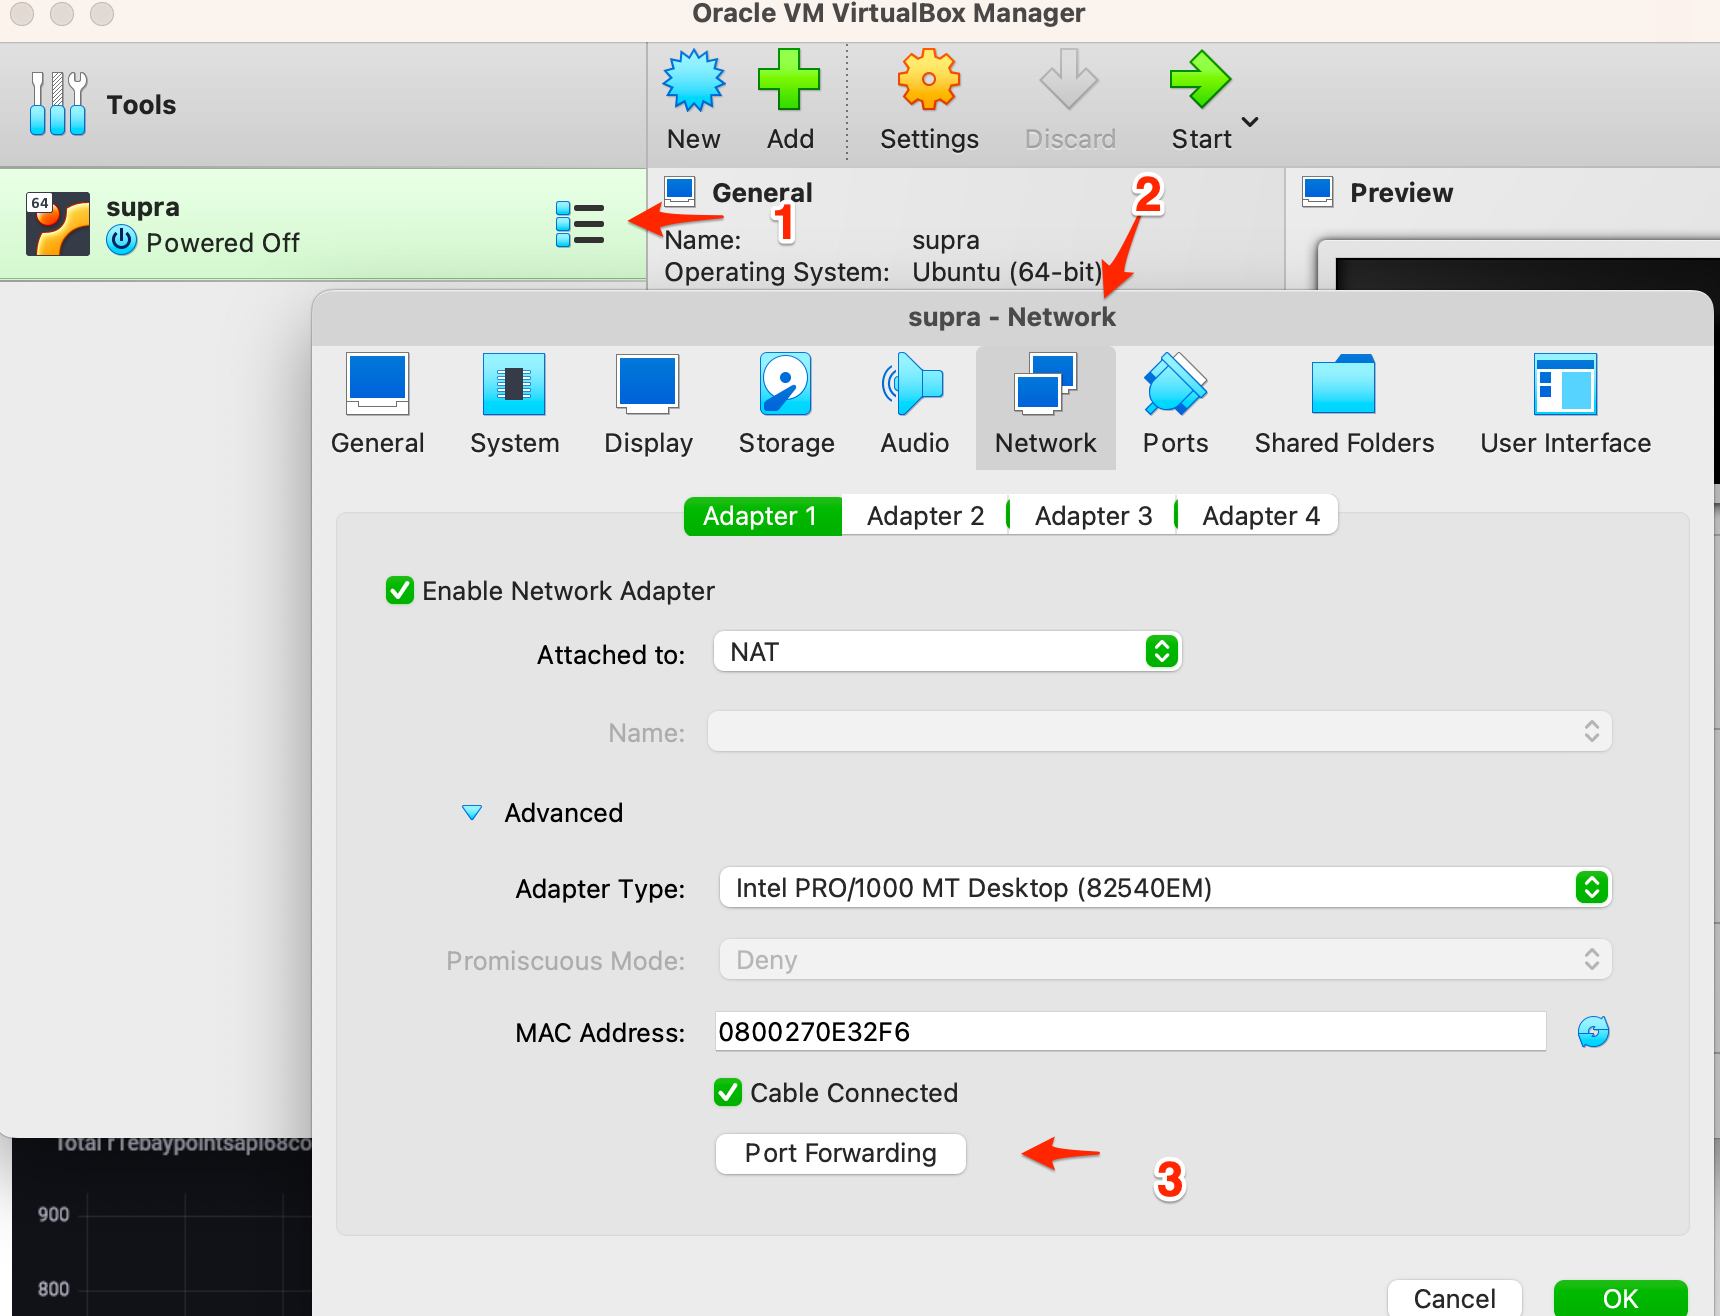
要本地ssh进入, 必须设置本地 host 到 VM 的端口转发.
设置端口转发步骤如下:

  1. 如果虚拟机没有 power off, 先 power off shutdown now.
  2. 进入 VirtualBox 界面, 选择虚拟机, 右键, 点击设置(Settings), 然后选择 网络(network), 点开高级(Advanced), 点击 端口转发(Port Forwarding)
    portForward.png
  3. 点击 添加 按钮, 添加名字, 主机端口, Guest 端口, 其它留空. 点击 OK 保存.
    forwordDetail.png
  4. 双击 VM 启动VM.
  5. 然后本地 命令行 登录. 端口是刚才设置的, 用户名是VM的登录用户名.

     $ ssh -p 2222 supra@localhost

使用 ssh 登录 qemu 启动的 VM

在实验 https://github.com/int0x03/kernel-utils 的过程中, 我们最后通过 qemu 启动 img 文件, 然后通过我们预设的用户名/密码进入 shell. 但是这个shell 和启动VM 用的同一个tty, 所以系统的一些message 会源源不断的输出到这个tty, 如果你要在这个shell 改些东西, 会非常尴尬.

如何启动另外一个tty?

要启动另外一个tty, 我们可以通过 ssh 登录这个VM, 就需要安装 openssh-server, 所以我们更改 config/env.sh 在需要安装到软件那行, 加入 openssh-server.

改后:

packages_to_install="systemd-resolved bpftrace bpfcc-tools gdb iptables openssh-server"

另外需要本地端口做转换, 所以需要更改 qemu 的启动参数, 在 boot 文件改动如下:

netdev_args="user,id=network0,net=192.168.0.0/24 -device e1000,netdev=network0 -net nic -net user,hostfwd=tcp::2222-:22"

sshd server 默认是不让以 root 用户登录的, 所以要更改 /etc/ssh/sshd_config 运行root 访问:

PermitRootLogin yes

然后重启 sshd server

systemctl restart ssh

如何登录

在宿主机 ssh -p 2222 root@localhost

Linux 内核的编译, 启动和制作ISO镜像

(本文最初发布在掘金 https://juejin.cn/post/7242312269887914041)
学习 Linux 内核的第一步就是下载 Linux 内核代码, 然后进行编译与运行.

下载内核源代码

内核源码除了 Linus 的官方 https://github.com/torvalds/linux git, 还有各家发布版的 Linux 内核. 最好去发布版的内核去下载, 这样编译过程中不容易出错.

我的 Linux 机器是 Ubuntu 22.04 TLS, 所以根据官方文档: https://wiki.ubuntu.com/Kernel/SourceCode, 可以 clone git 下载:

$ git clone --depth 1 -b master git://git.launchpad.net/~ubuntu-kernel/ubuntu/+source/linux/+git/jammy

这里为了减少下载文件的数量和大小, 选择只下载最新的代码, 只选择了master分支. 下载到 jammy 文件夹.

编译配置

编译之前先要安装编译内核需要的各种安装包:

$ sudo apt update 
$ sudo apt upgrade -y
$ sudo apt install git fakeroot build-essential ncurses-dev xz-utils libssl-dev bc flex bison libelf-dev -y 

配置并编译

$ cd jammy
# 此时并没有 .config 文件, 执行下面的命令会让你选择配置, 然后保存.
$ make menuconfig
# 生成 .config 文件
$ ls -lah .config
-rw-rw-r-- 1 sre sre 256K Jun  2 20:58 .config

我们可以看到 .config 文件里面的各种配置项目, 比如:

CONFIG_VERSION_SIGNATURE="Ubuntu 5.15.0-72.79-generic 5.15.98"
CONFIG_HAVE_KERNEL_GZIP=y
CONFIG_TSL2583=m

有些配置项表示一个纯文本的配置, 比如上面的版本号. 另外一些后面是 =y, =m 或者=n.

  1. =y:当选项被设置为=y时,表示该选项将作为内核的一部分编译进内核映像(静态编译)。这意味着相关的功能将始终可用,并包含在生成的内核映像中。当系统启动时,这些功能将立即可用,无需加载额外的模块。选择=y是在构建内核时将特定功能编译到内核中的一种方式。
  2. =m:当选项被设置为=m时,表示该选项将作为可加载模块编译(动态编译)。这意味着相关的功能将编译为独立的模块文件(通常是以.ko为扩展名),并在需要时由内核加载。使用=m选项可以将特定功能作为模块构建,以便在运行时根据需要加载和卸载。

选择=y=m取决于您对系统需求的权衡。如果您确定某个功能始终需要在内核运行时可用,并且不希望依赖额外的模块加载过程,则选择=y。如果您希望能够根据需要加载和卸载某个功能,并且不会一直使用该功能,则选择=m。

请注意,对于某些选项,可能还有其他设置,例如=n,表示将完全排除该功能的编译。这意味着相关的功能将在内核映像和模块中都不可用。选择特定的设置取决于您的需求和系统配置。

文字界面配置如下, 最后选择 Save 到 .config 文件.
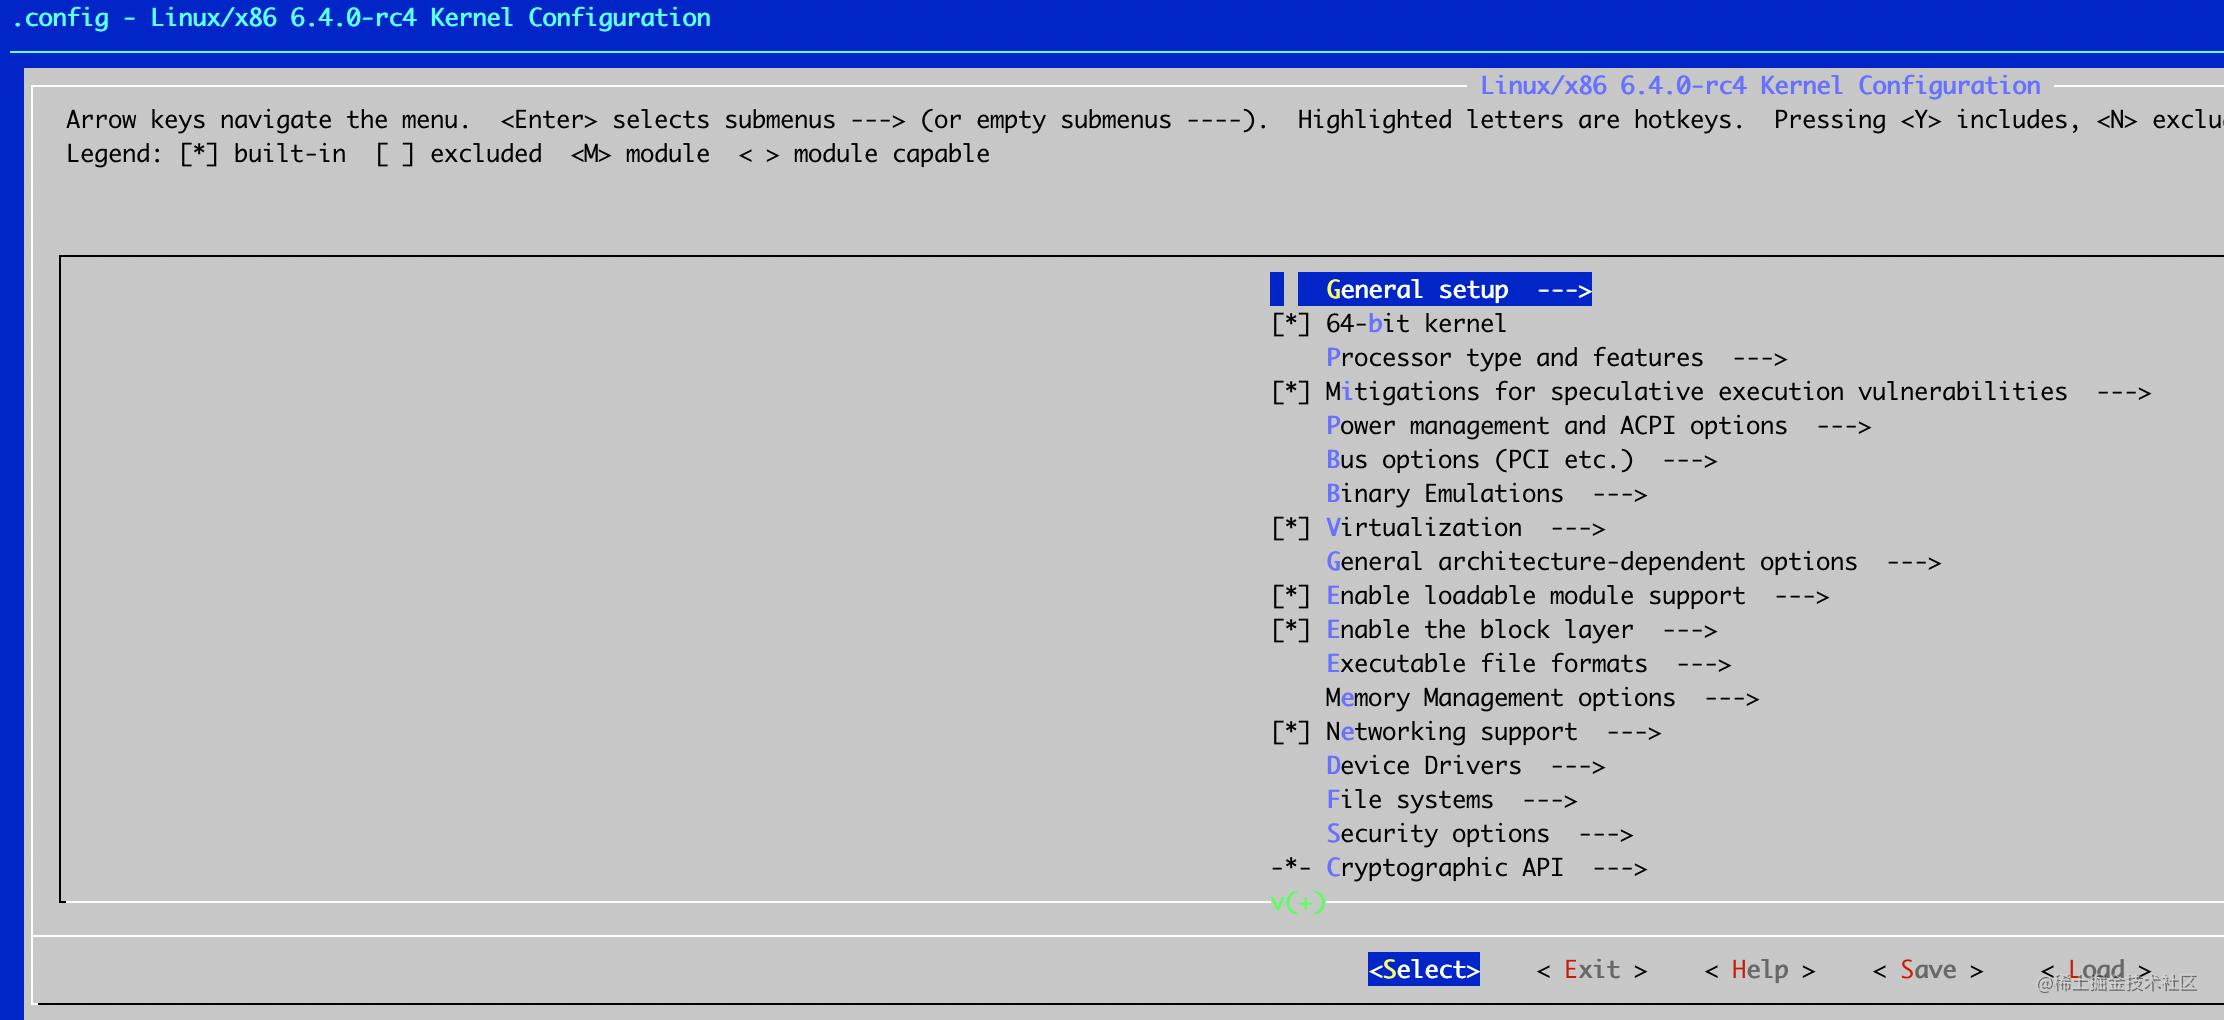
image.png

编译:

$ make all -j 4 # 使用 4个线程编译, 可能要等很久, 最后生成内核文件 arch/x86/boot/bzImage
...

$ ls -lah arch/x86/boot/bzImage
-rw-r--r-- 1 root root 11M Jun  5 08:59 arch/x86/boot/bzImage
Kernel: arch/x86/boot/bzImage is ready  (#1)
$ make help # 查看更多命令

如果遇到下面的出错:

sre@sre:~/work/exp/jammy$ make all -j 8
  ...
make[1]: *** No rule to make target 'debian/canonical-certs.pem', needed by 'certs/x509_certificate_list'.  Stop.
make[1]: *** Waiting for unfinished jobs....
make: *** [Makefile:1900: certs] Error 2

可以参看 https://askubuntu.com/questions/1329538/compiling-the-kernel-5-11-11 去掉里面证书的部分:

# 可以看到当前的配置, 改成=“”
sre@sre:~/work/exp/jammy$ cat .config | grep CONFIG_SYSTEM_TRUSTED_KEYS
CONFIG_SYSTEM_TRUSTED_KEYS="debian/canonical-certs.pem"

测试启动内核

首先安装 qemu, 然后启动内核:

$ sudo apt install qemu-system-x86 -y
$ qemu-system-x86_64 -kernel bzImage -append "console=tty0 console=ttyS0" -nographic
SeaBIOS (version 1.15.0-1)
iPXE (https://ipxe.org) 00:03.0 CA00 PCI2.10 PnP PMM+07F8B340+07ECB340 CA00
Booting from ROM...

Kernel Offset: disabled
---[ end Kernel panic - not syncing: No working init found.  Try passing init= option to kernel.

可以看到最后内核 panic, 因为没有任何 root 文件系统, 也没有 init 代码. 这时候, 我们可以通过 -initrd 来启动, 里面可以包含一个 busybox.

如何制作一个 initrd

使用 https://github.com/aweeraman/kernel-utils 提供的工具, 按照说明文档, 执行第一步 ./mk-initrd 就能生成 initramfs.cpio.gz, 里面包含了 initrc 和 busybox.

再次测试启动:

$ qemu-system-x86_64 -kernel bzImage -initrd initramfs.cpio.gz -append "console=tty0 console=ttyS0" -nographic

#这次成功启动

如何做一个最小的内核并启动进入命令行

制作最小内核

在 Linux 内核源代码根目录执行 make help, 你能看到各种有关配置的子命令, 比如:

  1. defconfig: New config with default from ARCH supplied defconfig.
  2. allnoconfig: New config where all options are answered with no.
  3. allyesconfig: New config where all options are accepted with yes.
  4. tinyconfig: Configure the tiniest possible kernel.

这里我们关注的是 tinyconfig, 于是我们先清理一下, 然后使用 tinyconfig 生成 .config 文件, 然后制作 image, 最后使用 qemu 去执行:

$ make mrproper
$ make tinyconfig
$ make all -j 8
    Kernel: arch/x86/boot/bzImage is ready

$ qemu-system-x86_64 -kernel bzImage  -append "console=tty0 console=ttyS0 init=/bin/sh" -nographic
SeaBIOS (version 1.15.0-1)
iPXE (https://ipxe.org) 00:03.0 CA00 PCI2.10 PnP PMM+07F8B340+07ECB340 CA00
Booting from ROM..

最后发现日志停在 Booting from ROM.. 就没有任何消息了.

这是因为 tinyconfig 包含的驱动或者配置太少, 导致没有后续输出, 我们需要在 tinyconfig 的基础上添加一些配置.

添加配置

添加配置使用 make menuconfig 来修改, 最后保存就好.

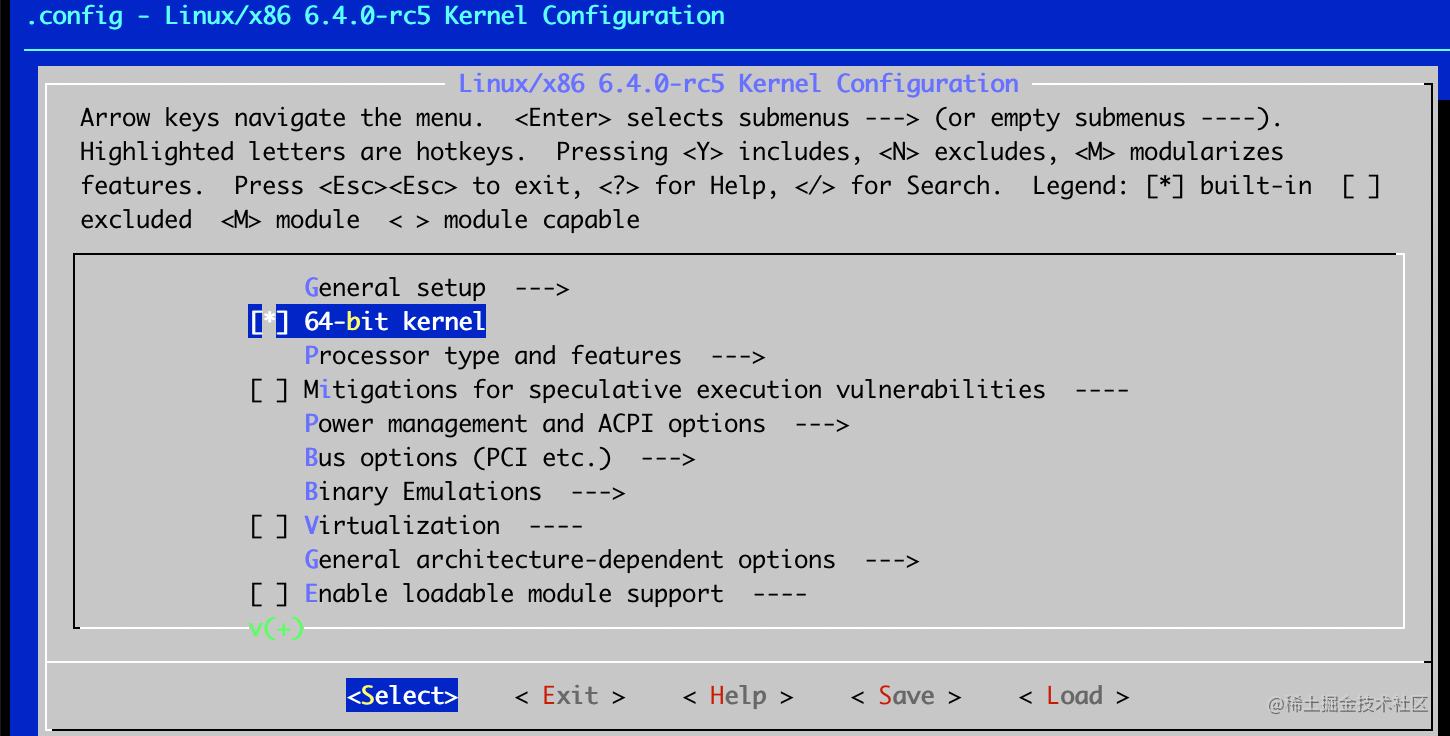
  1. 64-bit kernel
    image.png
  2. Device Drivers -> Character devices -> Enable TTY
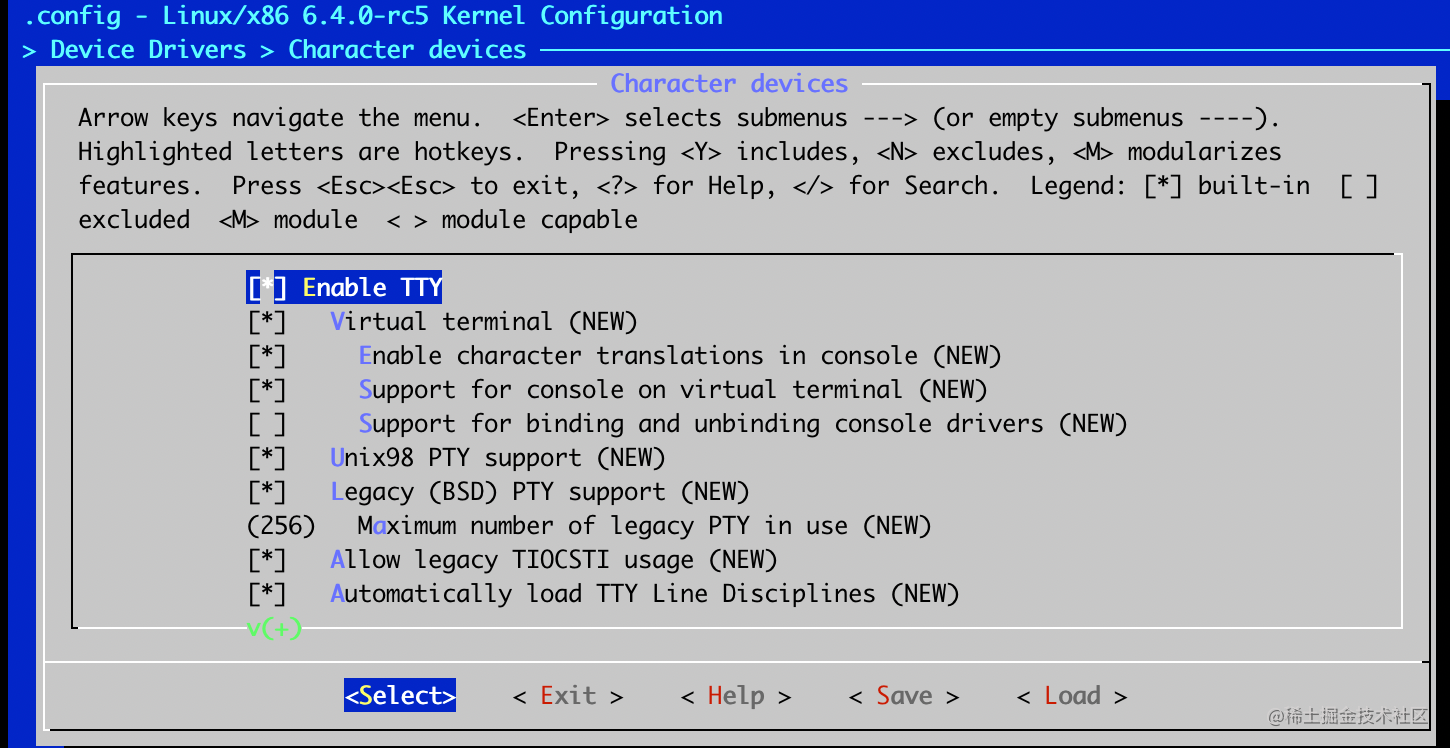
    image.png
  3. Device Drivers -> Character devices -> Serial drivers -> 8250/16550 and compatible serial support -> Console on 8250/16550 and compatible serial port
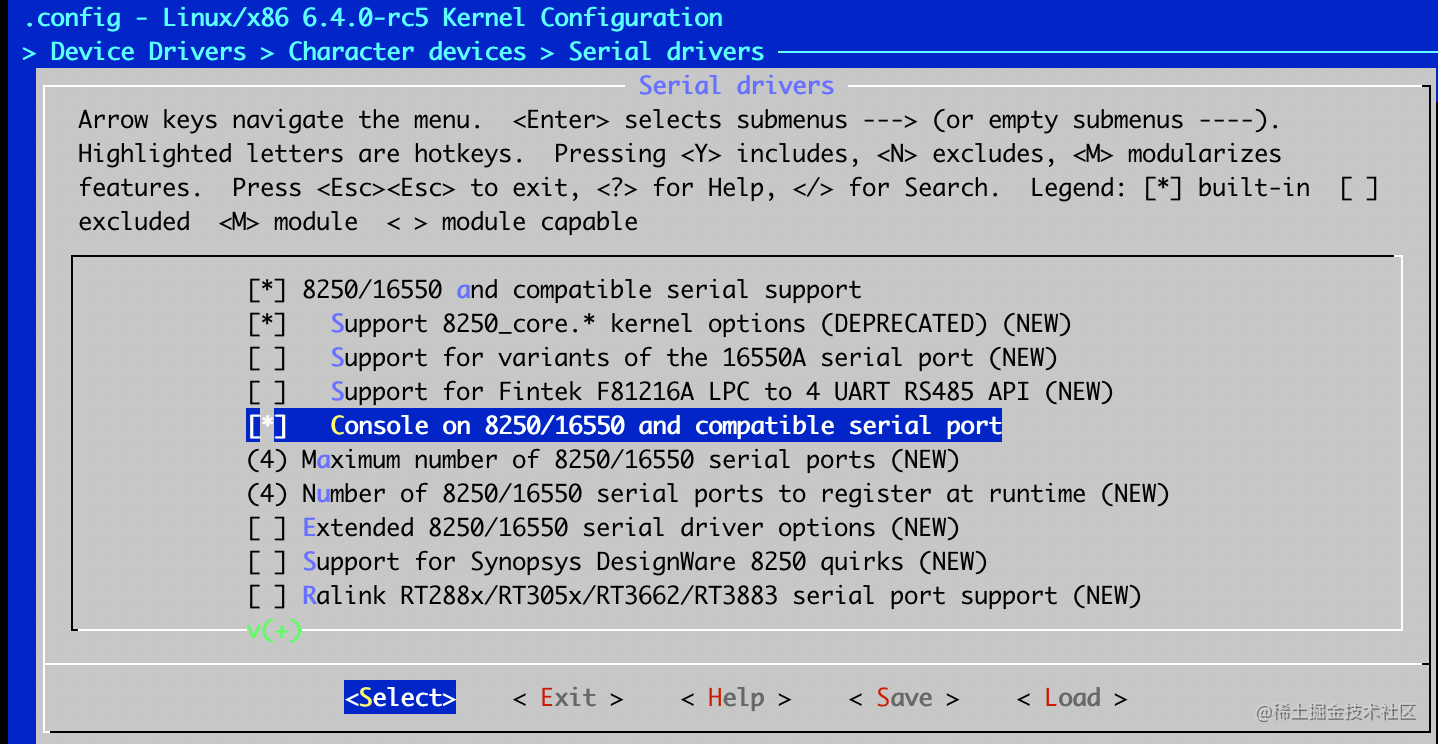
    image.png
  4. General setup > Configure standard kernel features (expert users) -> Enable support for printk
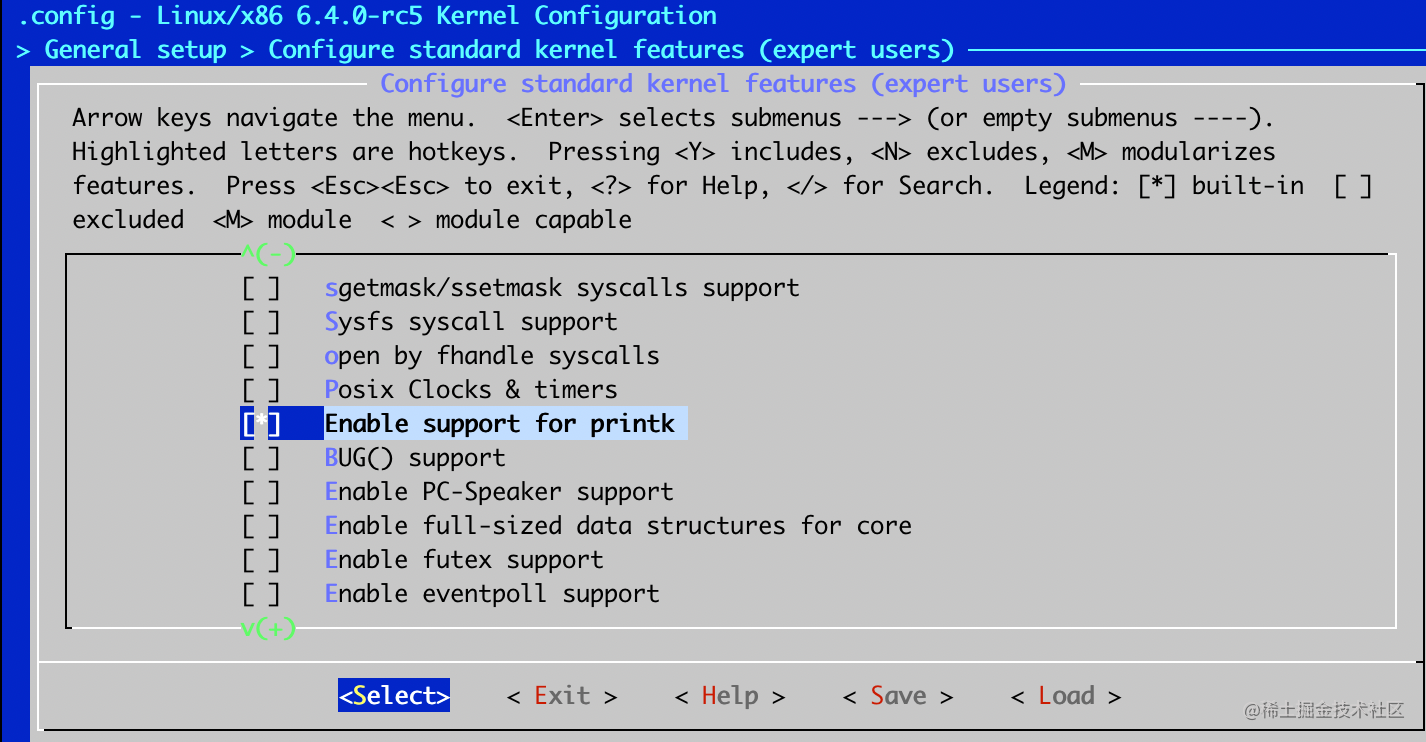
    image.png

保存上面配置, 并且做一个新的image:

$ make all -j 8 
$ qemu-system-x86_64 -kernel bzImage  -append "console=tty0 console=ttyS0 init=/bin/sh" -nographic

SeaBIOS (version 1.15.0-1)
iPXE (https://ipxe.org) 00:03.0 CA00 PCI2.10 PnP PMM+07F8B340+07ECB340 CA00
Booting from ROM..
Run /bin/sh as init process
Kernel panic - not syncing: Requested init /bin/sh failed (error -2).
Kernel Offset: disabled
---[ end Kernel panic - not syncing: Requested init /bin/sh failed (error -2). ]---

可以看到 Kernel panic, 因为我们只是启动 kernel, 没有root 文件系统, 也没有使用 initrd 的ramdisk.

修改config 支持 initrd

使用 make menuconfig 继续修改

  1. General setup -> Initial RAM filesystem and RAM disk (initramfs/initrd) support
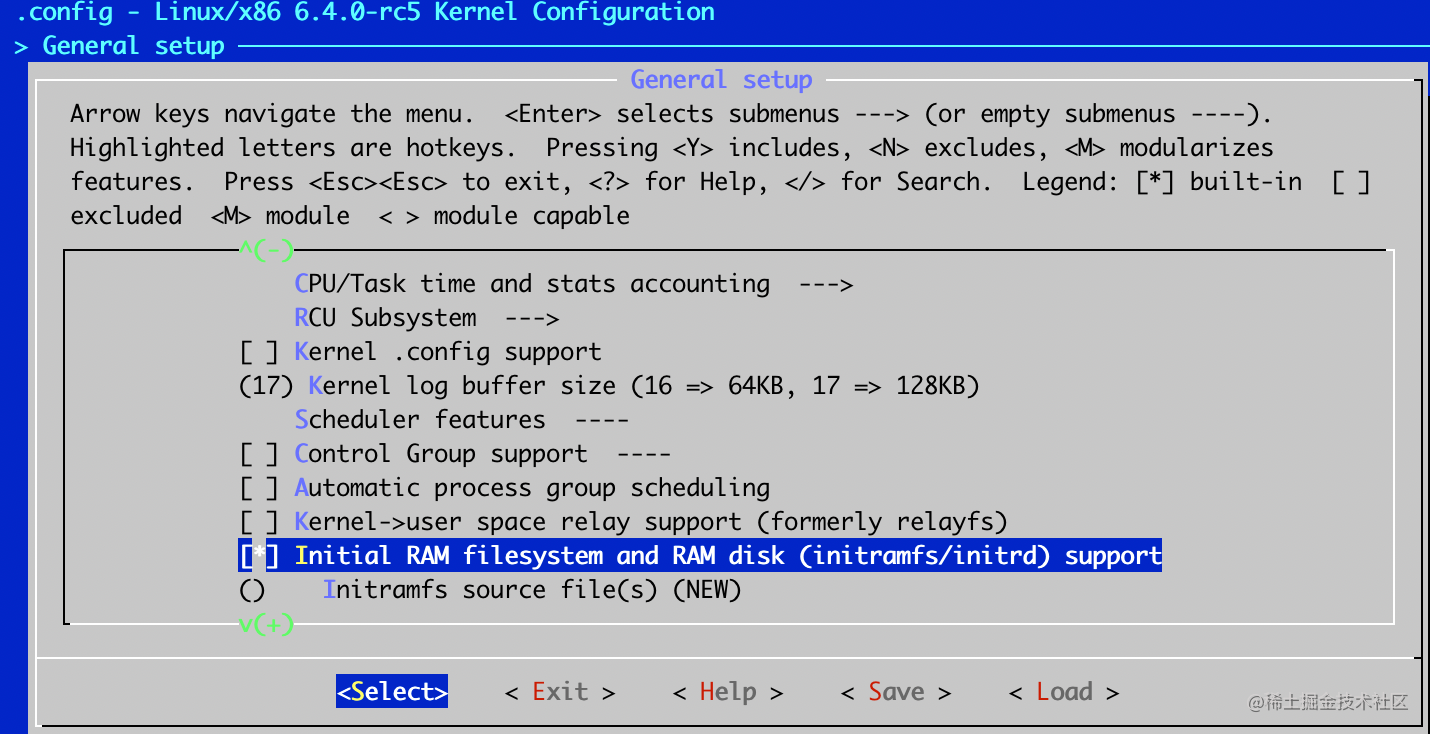
    image.png
  2. Executable file formats -> Kernel support for ELF binaries
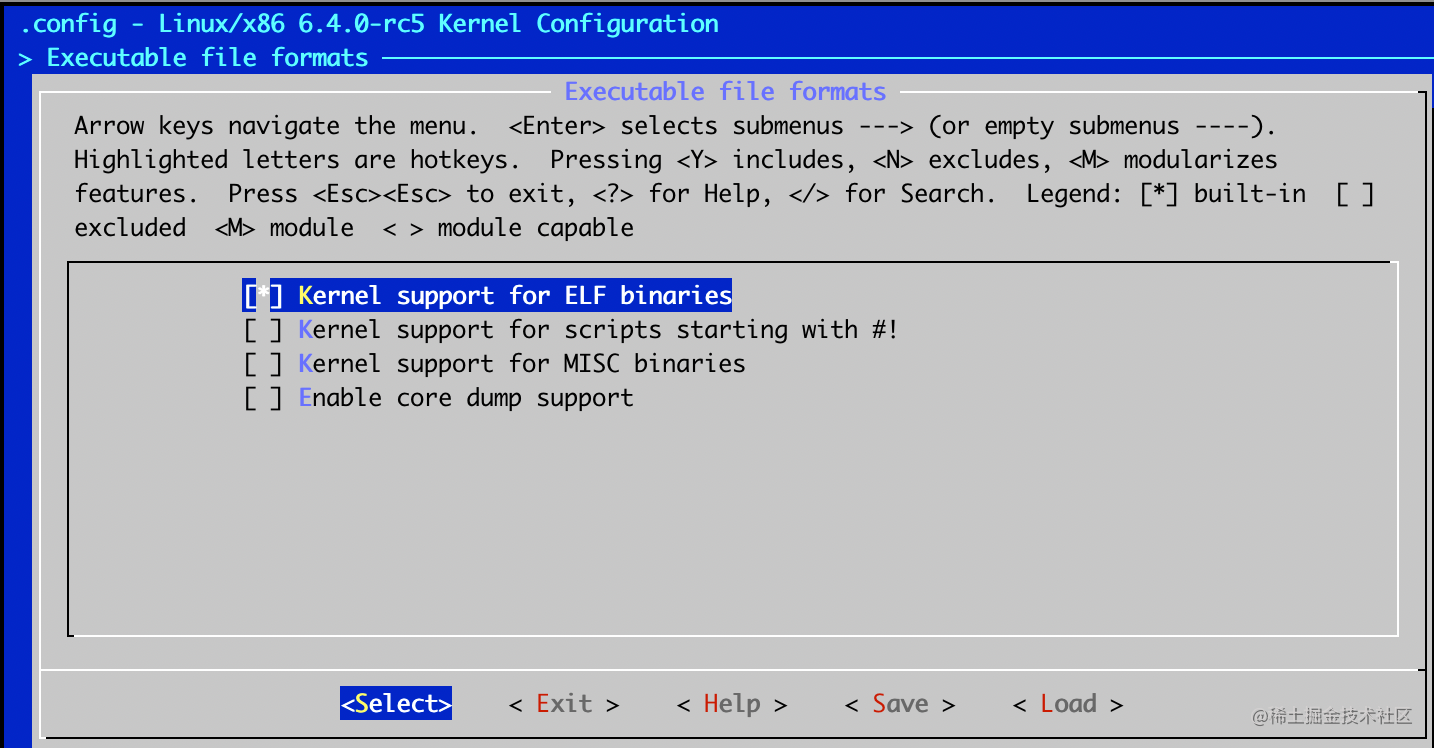
    image.png

保存, 然后 make all -j 8 再次制作image, 然后运行:

$ qemu-system-x86_64 -kernel bzImage -initrd initramfs.cpio.gz -append "console=tty0 console=ttyS0 init=/bin/sh" -nographic

Run /init as init process
Failed to execute /init (error -8)
Run /bin/sh as init process
/bin/sh: can't access tty; job control turned off
/ # input: ImExPS/2 Generic Explorer Mouse as /devices/platform/i8042/serio1/input/input2
clocksource: tsc: mask: 0xffffffffffffffff max_cycles: 0x311fac54234, max_idle_ns: 440795352581 ns
clocksource: Switched to clocksource tsc
uname -a
Linux (none) 6.4.0-rc5+ #3 Wed Jun  7 08:19:32 PDT 2023 x86_64 GNU/Linux
/ # ls /bin/
...

/ # ps aux
PID   USER     TIME  COMMAND

可以看到 kernel 启动后执行了 /bin/sh, 我们使用 uname能看到 kernel 的版本号, 但是ps 没有任何输出. 那是因为我们没有挂载 proc 文件系统. 同时执行挂载 proc 文件系统的脚本在 initramfs.cpio.gz 内部的 init 文件里, 它是一个 shell, 所以要使 kernel 支持 shell 的 #!.

再次通过 make menuconfig 修改配置:

  1. Executable file formats -> Kernel support for scripts starting with #!
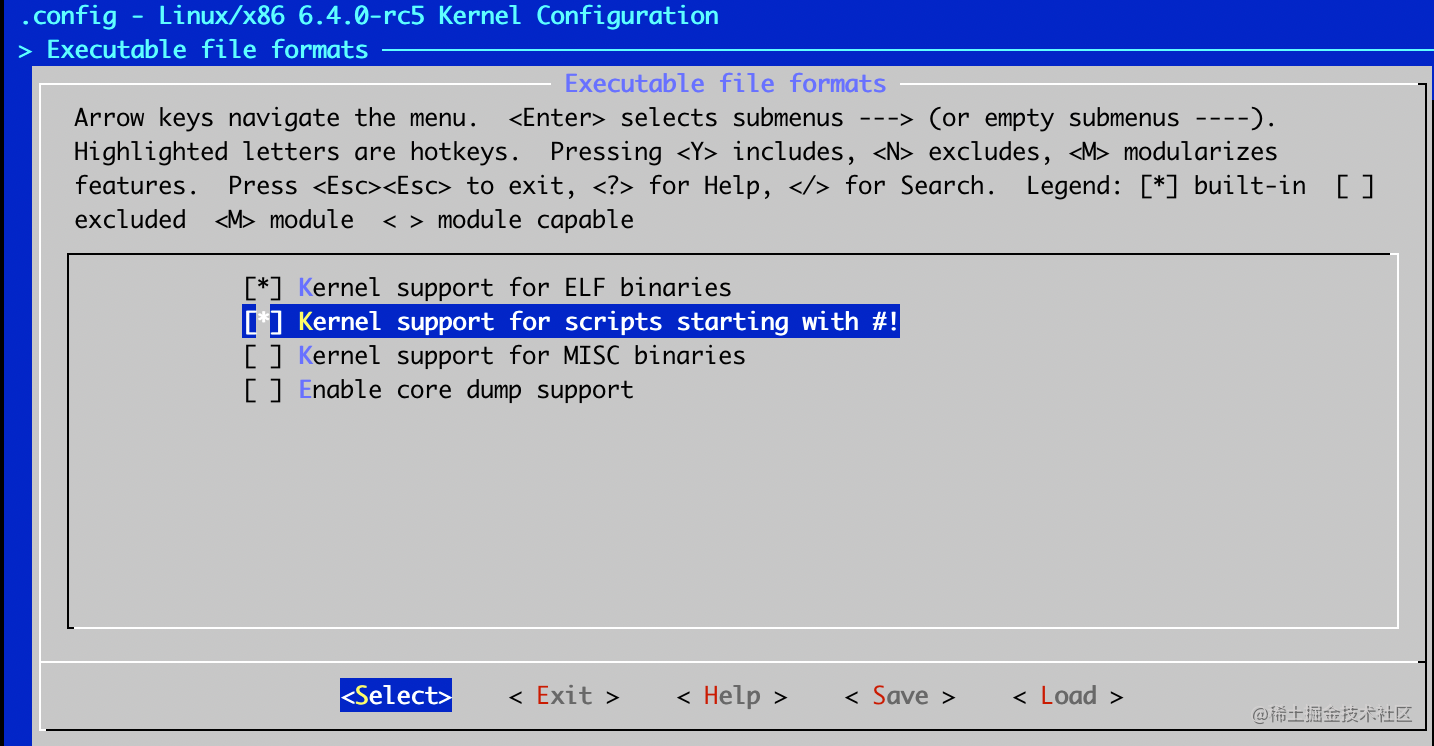
    image.png
    2. File systems > Pseudo filesystems -> (/proc file system support & sysfs file system support)
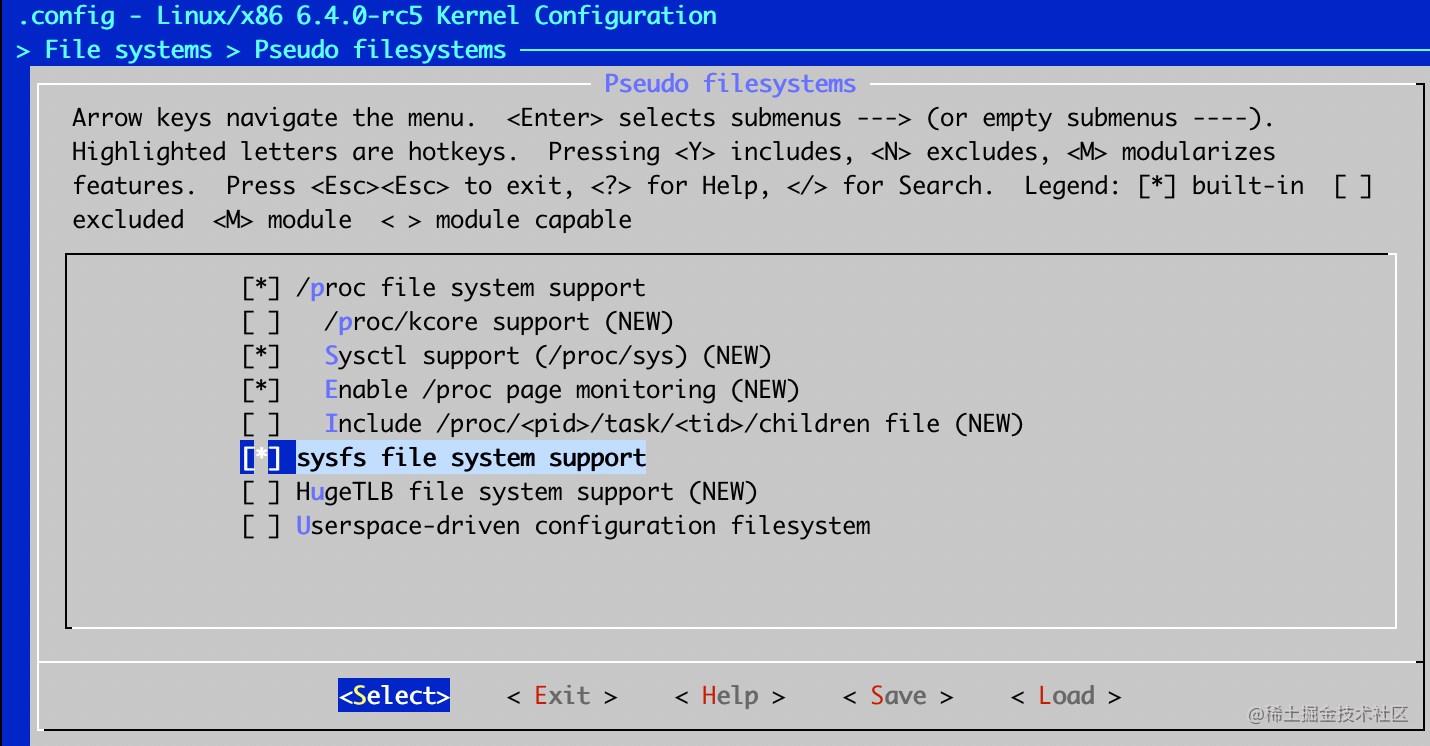
    image.png

修改完保存, 然后重新制作 image, 并且运行:

$ qemu-system-x86_64 -kernel bzImage -initrd initramfs.cpio.gz -append "console=tty0 console=ttyS0 init=/bin/sh" -nographic

ps
PID   USER     TIME  COMMAND
    1 0         0:00 {init} /bin/sh /init
    2 0         0:00 [kthreadd]
    3 0         0:00 [kworker/0:0-eve]
    4 0         0:00 [kworker/0:0H]
    5 0         0:00 [kworker/u2:0-ev]
    6 0         0:00 [mm_percpu_wq]
    7 0         0:00 [ksoftirqd/0]
    8 0         0:00 [oom_reaper]
    9 0         0:00 [writeback]
   10 0         0:00 [kswapd0]
   11 0         0:00 [kworker/u2:1-ev]
   12 0         0:00 [kworker/0:1-eve]
   13 0         0:00 [kworker/u2:2-ev]
   14 0         0:00 [kworker/0:2]
   19 0         0:00 sh
   20 0         0:00 ps

如何制作一个可运行的 ISO 文件

创建文件结构并且复制数据

$ mkdir -p iso/boot/grub
$ cp bzImage iso/boot/
$ cp initramfs.cpio.gz  iso/boot/

创建 grub.cfg 文件

 $ vim iso/boot/grub/grub.cfg
set default=0
set timeout=10# Load EFI video drivers. This device is EFI so keep the
# video mode while booting the linux kernel.
insmod efi_gop
insmod font
if loadfont /boot/grub/fonts/unicode.pf2
then
        insmod gfxterm
        set gfxmode=auto
        set gfxpayload=keep
        terminal_output gfxterm
fimenuentry 'myos' --class os {
    insmod gzio
    insmod part_msdos
    linux /boot/bzImage init=/bin/sh console=ttyS0 console=tty0
    initrd /boot/initramfs.cpio.gz
}

安装 xorriso, mtools 并且制作 ISO image:

$ sudo apt install xorriso mtools -y
$ grub-mkrescue -o myos.iso iso/

$ ls -lah myos.iso

使用 Qemu 测试新的 ISO image

$ qemu-system-x86_64 -boot d -cdrom myos.iso -nographic

image.png

linux 上如何测试一个网页能不能用

今天有个同事说, 她在生产环境某个container里面的代码访问某个网页页面, 返回的结果不是期望的. 能不能一起看看到底是哪里出错了? 竟然有这么有趣的问题, 于是满口答应, 一块去探个究竟.

当然, 第一步就是去重现一下场景. 于是kubectl exec <pod_id> -n <ns> bash 登录container, 想着使用curl去模拟访问, 结果很沮丧. 为啥, 这个 container 真干净, 上面的代码是Java写的, 只有jdk, 没有curl, 没有wget, 让我怎么复现? 难道要自己写个Java Client, 打包编译, 然后去复现?

除了使用Java代码去实现访问网页http请求, 其他真没办法了吗? 让我们整理一下在Linux上常见的使用工具访问web网页的办法.

使用 curl

curl 是最方便的测试网页访问的工具, 很多Linux发布版都带curl, 支持很多协议.

$ curl -vvv 'https://www.tianxiaohui.com/index.php/about.html'

使用 wget

wget 支持 http, https, ftp, ftps这些协议去访问某个页面或资源, 也很方便使用, 很多Linux 发行版也自带.

$ wget 'https://www.tianxiaohui.com/index.php/about.html'

使用 netcat | ncat

netcat 是 GNU 一个网络实用工具, 不过根据官方网站在2004年发完0.7.1版本之后, 就没更新过了, 我发现我 Ubuntu 使用的是openBSD 版本的(https://packages.debian.org/sid/netcat-openbsd). 它最常用的是打开端口, 建立连接, 至于http协议, 那要自己去实现. 实现http协议还好, 如果实现证书认证https, 那可是有点难度.

所以, 你看我只能拿到一个400的错误. 不过要是访问非https的, 还是很可行的.

$ printf “GET /index.php/about.html HTTP/1.0\r\nHost: www.tianxiaohui.com\r\n\r\n” | nc www.tianxiaohui.com 443
F<html><head><title>400 Bad Request</title></head><body>
<h2>HTTPS is required</h2>
<p>This is an SSL protected page, please use the HTTPS scheme instead of the plain HTTP scheme to access this URL.<br />
<blockquote>Hint: The URL should starts with <b>https</b>://</blockquote> </p>
<hr />
Powered By LiteSpeed Web Server<br />
<a href='http://www.litespeedtech.com'><i>http://www.litespeedtech.com</i></a>
</body></html>

有人称它为网络debug的瑞士军刀, 没有继续开发, 是不是可惜了. 所以鼎鼎大名的nmap工具下面, 发扬了netcat的功能, 开了一ncat, 比netcat 更好用. 还支持 ssl. 那必须测试一把

$ printf "GET /index.php/about.html HTTP/1.0\r\nHost: www.tianxiaohui.com\r\n\r\n" | ncat -v --ssl www.tianxiaohui.com 443

Ncat: Version 7.80 ( https://nmap.org/ncat )
Ncat: SSL connection to 154.213.16.200:443.
Ncat: SHA-1 fingerprint: 8461 369A 0DE4 7401 AE26 4259 B0C2 CC9F FE0B 66F5
HTTP/1.0 200 OK
Connection: close
content-type: text/html; charset=UTF-8
x-pingback: https://www.tianxiaohui.com/index.php/action/xmlrpc
date: Thu, 16 Feb 2023 15:08:37 GMT
server: LiteSpeed
vary: User-Agent,User-Agent

<!DOCTYPE HTML>
<html class="no-js">
<head>
...省略
</html>

完美拿到数据

使用 openssl

openssl 是一个开源的, 通用的加密安全的工具软件, 很多Linux 发行版都带了它, 使用它进行网页访问, 也不在话下.

$printf "GET /index.php/about.html HTTP/1.0\r\nHost: www.tianxiaohui.com\r\n\r\n" | openssl s_client -quiet -state -connect www.tianxiaohui.com:443
SSL_connect:before SSL initialization
SSL_connect:SSLv3/TLS write client hello
SSL_connect:SSLv3/TLS read server hello
SSL_connect:TLSv1.3 read encrypted extensions
depth=2 C = US, O = Internet Security Research Group, CN = ISRG Root X1
verify return:1
depth=1 C = US, O = Let's Encrypt, CN = R3
verify return:1
depth=0 CN = www.tianxiaohui.com
verify return:1
SSL_connect:SSLv3/TLS read server certificate
SSL_connect:TLSv1.3 read server certificate verify
SSL_connect:SSLv3/TLS read finished
SSL_connect:SSLv3/TLS write change cipher spec
SSL_connect:SSLv3/TLS write finished
HTTP/1.0 200 OK

仅仅使用 bash, 你没看错

如果你的container里面非常干净, 上面的软件全没有, 但恰巧你安装的是bash, 那么这个任务还是能完成. 仔细看:

supra@suprabox:~$ exec 4<>/dev/tcp/www.tianxiaohui.com/443
supra@suprabox:~$ echo -e "GET /index.php/about.html HTTP/1.0\r\nHost: www.tianxiaohui.com\r\n\r\n" >&4
supra@suprabox:~$ cat  <&4
<html><head><title>400 Bad Request</title></head><body>
<h2>HTTPS is required</h2>
<p>This is an SSL protected page, please use the HTTPS scheme instead of the plain HTTP scheme to access this URL.<br />
<blockquote>Hint: The URL should starts with <b>https</b>://</blockquote> </p>
<hr />
Powered By LiteSpeed Web Server<br />
<a href='http://www.litespeedtech.com'><i>http://www.litespeedtech.com</i></a>
</body></html>

虽然, 能拿到结果, 但是没有ssl协商, 所以网站只给了一个400. 所以 bash 这种方式, 对于https只能验证连接成功, 不能验证拿到的结果.

那么我们就拿一个http的网站来练习一下, 可是如今到哪里去找一个还支持http的网站呢, 哈哈, 还真找到一个. 如下:

supra@suprabox:~$ exec 5<>/dev/tcp/www.henu.edu.cn/80
supra@suprabox:~$ echo -e "GET /index.htm HTTP/1.0\r\nHost: www.henu.edu.cn\r\n\r\n" >&5
supra@suprabox:~$ less  <&5

完美拿到结果, 自己处理ssl 太难了, 不过对于仅仅http, 还是很管用的.

对于上面3步的解释:

  1. /dev/protocol/host/port 是bash的一个重定向文件, 它帮你建立一个连接, 协议可以是tcp或udp, host可以是主机名或ip, 所以第一行通过exec建立一个文件描述符是5的重定向.
  2. 第二步是把 http 协议的request 发送到这个连接
  3. 第三步读出返回的结果网页.

总结

上面的很多工具都很好用, 有些还支持设置代理, 设置timeout 等, 据有相当丰富的功能. 在container 里面受限的情况下, 还有哪些好用的网页测试工具? 当然, 你说我container 里面有 python, 有 perl, wow, 那你太幸福了.